Deep Learning software installation guide on fresh Ubuntu
Guide to building and installing CUDA, CuDNN, OpenCV, FFMPEG, Theano, Tensorflow, Keras, Lasagne, Torch and Caffe. It also includes common issues faced and recommended libraries and versions.
Table of Contents
Recently I assembled a machine with 4 GPU (Titan X), a clone of NVIDIA DevBox. There are few other blog posts which describe the hardware guide, so I will not go into the same detail. Please refer this. The actual list of parts I bought can be found at PCPart Picker.
However this blog post is about the software guide. Although, most of the researchers or grad students like me will have their own custom requirement I thought I should share my software installation guide, for someone who might be new and would benefit from some of these. I have had to do this process couple of times now, and I have learned from my mistakes.
NOTE 1: Docker : If getting maximum performance is not a requirement, I would suggest the reader to download Docker Images for Deep Learning packages freely available online, for e.g. Time required for all these standalone installation is justified only when these are going to be used over and again, for e.g in a research lab.
NOTE 2: Redundancy : Some of the commands can be combined to be done in a single line, especially installing libs from apt-get. But I prefer to run them one at a time, for more control and feedback on installation process.
NOTE 3: Python 2 : While most of the scientific community is moving on with Python 3, it seems Deep Learning communmmunty is happy with Python 2. Thus all instllations except where mentioned pertain to Python 2.7.
NOTE 4: Anaconda : Why not Anaconda ? I have done some previous installations with Anaconda, but it becomes messy with smaller libs, and also compiling OpenCV. More importantly, I do not need all the utils of Anaconda, and on this machine I would like to minimize the libs installed.
Upgrade the Ubuntu
Always, upgrade the ubuntu for security and sanity purposes !
sudo apt-get update# Fetches the list of available updatessudo apt-get upgrade# Strictly upgrades the current packagessudo apt-get dist-upgrade# Installs updates (new ones)
RAID 1
Partition and mount the harddrives
Since my configuration has two HDD of 3 TB, I have configured them as RAID 1, this provides data redundancy. You do not want to lose weeks worth of training due to HDD crash ! If you do not want RAID 1, then skip this step.
sudo apt-get install -y mdadm# Install mdadm, tool to manage RAID 1sudo mdadm --assemble --scan# check for existing raids ## found existing !! If not prepare, refer tutorial here http://askubuntu.com/questions/526747/setting-up-raid-1-on-14-04-with-an-existing-drive
Mounting
df -aTh# shows list of all mountssudo mount /dev/md0 /media/hdd/# (Manual) mount existingblkid# shows uuid for drives to add to fstab Add the following line to /etc/fstabthe RAID 1 mount of two hdd
UUID=06ad59d9-3176-4c16-95e9-77356cc572d7 /media/hdd ext2 defaults 0 1
sudo mount -a# (Permanent) mount using fstab
Install Essentials, Extras, Git, Zsh
sudo apt-get install -y build-essentialsudo apt-get install -y ubuntu-restricted-extrassudo apt-get install -y vimsudo apt-get install -y gitsudo apt-get install -y git-core- `sudo apt-get install -y checkinstall # allows for easy install/uninstall of packages from source
sudo apt-get install -y zshsudo apt-get install -y tmuxsudo apt-get install -y CMakesudo apt-get install -y libopenblas-dev- `sudo apt-get install -y libhdf5-dev
sudo apt-get install -y gcc-4.8# because CUDA (7.0 & 7.5) works will less than 4.9.0- make soft link for gcc in /usr/bin
sudo apt-get install -y g++-4.8# because CUDA (7.0 & 7.5) works will less than 4.9.0- make soft link for g++ in /usr/bin
sudo apt-get install -y apache2- sudo /etc/init.d/apache2 start ` # start the Apache Server
Python
Python and Libs
python get-pip.py# install pipsudo apt-get install python-dev# pythonLibssudo apt-get install libblas-dev liblapack-dev libatlas-base-dev gfortransudo pip install cython git+https://github.com/scipy/scipy# Installs Cython and Scipy both (Cython is requirement for scipy)sudo pip install -U scikit-learn# Requires numpy and scipy- Matplotlib better to install using APT, lot of system lib dependency
sudo apt-get install -y matplotlib
Highend computing
sudo pip install numpysudo pip install markupsafesudo pip install h5pysudo pip install nltksudo pip install nose- Install leveldb # for efficient use with Caffe, and probably other libs
- git clone git@github.com:google/leveldb.git
- make
- sudo mv out-shared/libleveldb.* /usr/local/lib/
- sudo cp -R include/leveldb /usr/local/include
- sudo ldconfig
Python3 and Ipython (Jupyter)
sudo apt-get install python3-pip# to install jupyter for python3, it needs pip3 and does not work using pipsudo pip install jupytersudo pip3 install jupyter# I don’t know why it requires sepearate installation, especially when not done using Anaconda !
NVIDIA
Install NVIDIA Drivers
I would highly advice against installation using apt-get as it always installs one version older, and with NVIDIA every generation of driver brings performance boosts.
sudo service lightdm stop# stop the X server before running the installation NOTE! Could not sign kernels, make a note of this. It might lead to problems with some libraries later on- Download AMD 64 bit Linux drivers from NVIDIA website (manual download and transfer and execute the provided script or binary)
Install CUDA
sudo ./cuda_7.0.28_linux.run --override# for cuda 7.0sudo ln -s /usr/bin/g++-4.8 /usr/local/cuda/bin/g++# this might be omitted if a symbolic link has been made from /usr/bin/g++ like mentioned abovesudo ln -s /usr/bin/gcc-4.8 /usr/local/cuda/bin/gcc# this might be omitted if a symbolic link has been made from /usr/bin/gcc like mentioned above
Install CuDNN
CuDNN improves the performance of deep learning libraries. Unfornately, not all of them work with latest version. Google’s Tensorflow requires v2, Theano & Caffe works with v3, whereas latest version is 4. To get the library you will have to register at NVIDIA CuDNN
- Download the archive folder
cd <extracted_directory>export LD_LIBRARY_PATH=pwd:$LD_LIBRARY_PATH
Although not required, I find it useful to rather install both the version of CuDNN (2 and 3). Put the libs of v2 in CUDA 6.5 or CUDA 7.0 (for Tensorflow), and v3 in CUDA 7.5.
Image processing and Computer Vision
Install OpenCV
This is to install OpenCV 3.1 on Ubuntu 15.10. Thanks to the people at BVLC/Caffe, I did not have to tweak the settings, and pretty much their provided instructions worked.
-
sudo apt-get -y install libopencv-dev build-essential cmake git libgtk2.0-dev pkg-config python-dev python-numpy libdc1394-22 libdc1394-22-dev libjpeg-dev libpng12-dev libtiff5-dev libjasper-dev libavcodec-dev libavformat-dev libswscale-dev libxine2-dev libgstreamer0.10-dev libgstreamer-plugins-base0.10-dev libv4l-dev libtbb-dev libqt4-dev libfaac-dev libmp3lame-dev libopencore-amrnb-dev libopencore-amrwb-dev libtheora-dev libvorbis-dev libxvidcore-dev x264 v4l-utils unzip -
Download OpenCV from http://opencv.org/downloads.html and unpack. Enter the unpacked directory. Execute:
-
mkdir build && cd build/# If you have Oh-my-zsh then justtake build -
cmake -D CMAKE_BUILD_TYPE=RELEASE -D CMAKE_INSTALL_PREFIX=/usr/local -D WITH_TBB=ON -D WITH_V4L=ON -D WITH_QT=ON -D WITH_OPENGL=ON .. -
make -j12 # j 12 makes 12 parallel processes using all the cores to speed up the process, in a single core, the build might take couple of hours. -
sudo checkinstall # to create the deb package, and install it.
FFMPEG
sudo apt-get install -y ffmpeg
ImageMagick
sudo apt-get install -y imagemagick
Install GPU Libraries
Theano
sudo pip install Theanosudo apt-get install -y python-pycuda# also installs the dependencies, but it is best to have own installation of nvidia-cuda, to make sure the version is proper and to maintain multiple version installation
Tensorflow
sudo pip install --upgrade https://storage.googleapis.com/tensorflow/linux/gpu/tensorflow-0.6.0-cp27-none-linux_x86_64.whlTensorflow (as of Jan 15, 2016), works on Cuda 7.0 and CuDNN v2 ), thus change /usr/local/cuda softlink
Keras
sudo pip install keras# Could it get any easier !! Thanks people developer of Keras !
Lasagne
sudo pip install https://github.com/Lasagne/Lasagne/archive/master.zip# Preferred way to install Lasagne !
Torch
curl -s https://raw.githubusercontent.com/torch/ezinstall/master/install-deps | bashgit clone https://github.com/torch/distro.git ~/torch --recursivecd ~/torch; ./install.sh
Aditionally to load caffe models in torch,
luarocks install loadcaffe
Caffe
Note
- Switch back to GCC 5 and G++ 5, because the prebuilt libraries of Ubuntu 15.10 are built on gcc 5, and thus compiling caffe in 4.8 will
not link them. However, caffe will refuse to compile with gcc 5, with error from following file
/usr/local/cuda/include/host_config.hJust comment out the line 115, which checks the version of GCC - Use the CMake instead of default make (checkout https://github.com/BVLC/caffe/pull/1667 )
Requirements
sudo apt-get install libprotobuf-dev libleveldb-dev libsnappy-dev libopencv-dev libhdf5-serial-dev protobuf-compilersudo apt-get install --no-install-recommends libboost-all-devsudo apt-get install libgflags-dev libgoogle-glog-dev liblmdb-devfor req in $(cat python/requirements.txt); do pip install $req; done
Issues
-
Linking Error in Leveldb e.g
        Linking CXX executable caffe
        ../lib/libcaffe.so.1.0.0-rc3: undefined reference to `leveldb::Status::ToString[abi:cxx11]() const'
        ../lib/libcaffe.so.1.0.0-rc3: undefined reference to `leveldb::DB::Open(leveldb::Options const&, std::__cxx11::basic_string<char, std::char_traits<char>, std::allocator<char> > const&, leveldb::DB**)'
        collect2: error: ld returned 1 exit status
        tools/CMakeFiles/caffe.bin.dir/build.make:122: recipe for target 'tools/caffe' failed
        make[2]: *** [tools/caffe] Error 1
Solution, recompile Leveldb with GCC 5
sudo apt-get install libsnappy-devwget https://leveldb.googlecode.com/files/leveldb-1.9.0.tar.gz\ntar -xzf leveldb-1.9.0.tar.gz\ncd leveldb-1.9.0makesudo mv libleveldb.* /usr/local/libcd includesudo cp -R leveldb /usr/local/includesudo ldconfiG
-
Linking Error in Protobuf e.g
        Linking CXX executable caffe
        CMakeFiles/caffe.bin.dir/caffe.cpp.o: In function `std::string* google::MakeCheckOpString<cudaError, cudaError>(cudaError const&, cudaError const&, char const*)':
        caffe.cpp:(.text._ZN6google17MakeCheckOpStringI9cudaErrorS1_EEPSsRKT_RKT0_PKc[_ZN6google17MakeCheckOpStringI9cudaErrorS1_EEPSsRKT_RKT0_PKc]+0x43): undefined reference to google::base::CheckOpMessageBuilder::NewString()'
        CMakeFiles/caffe.bin.dir/caffe.cpp.o: In function `std::string* google::MakeCheckOpString<unsigned long, int>(unsigned long const&, int const&, char const*)':
        caffe.cpp:(.text._ZN6google17MakeCheckOpStringImiEEPSsRKT_RKT0_PKc[_ZN6google17MakeCheckOpStringImiEEPSsRKT_RKT0_PKc]+0x43): undefined reference to `google::base::CheckOpMessageBuilder::NewString()'
        CMakeFiles/caffe.bin.dir/caffe.cpp.o: In function `main':
        caffe.cpp:(.text.startup+0x3e): undefined reference to `google::SetVersionString(std::string const&)'
        caffe.cpp:(.text.startup+0x6e): undefined reference to `google::SetUsageMessage(std::string const&)'
        ../lib/libcaffe.so.1.0.0-rc3: undefined reference to `google::protobuf::internal::WireFormatLite::WriteStringMaybeAliased(int, std::string const&, google::protobuf::io::CodedOutputStream*)
Solution, change your current compiler to GCC Use
gcc --versionto make sure the correct version, andwhich gccto check the softlinks to actual gcc -
Relevant issues to checkout https://github.com/BVLC/caffe/issues/2690 and https://github.com/BVLC/caffe/issues/3046
-
In Ubuntu 15.10 when using GCC 5.2, compiling might fail as Protobuf was compiled with wrong flags. Add the following to Makefile
CXXFLAGS += -D_GLIBCXX_USE_CXX11_ABI=0 -
Issues with Google Lib Protobuf (even after the ABI CXX11 fix)
cd /usr/local/libsudo mkdir libprotobuf_mv libprotobuf* libprotobuf_cd ~apt-get source libprotobuf-devllcd protobuf-2.6.1make./configuremake -j12sudo make install
Installation
- mkdir build
- cd build
- cmake .. # Make kept giving me issues, but CMake worked.
- make all
- make test
- make runtest
- make pycaffe # To be able to import caffe
To be updated with instructions for Nervana
Optional
Remove unnecessary Ubuntu folders
When working with only terminal via ssh, you do not need some of these folders //
rm -rf ~/Desktoprm -rf ~/Public# Is not persistent, after restart Ubuntu recreates this directoryrm -rf ~/Picturesrm -rf ~/Musicrm -rf ~/Videosrm -rf ~/Downloadsrm -rf ~/Templatesrm -rf ~/Documentsrm -rf ~/examples.desktop
Customization
These are my personal customization which I do on every machine I use. You may find them useful. They increase visual appeal and efficiency of working on Linux Machine.
chsh -s which zsh# Change the shell to ZSH (which zsh should be inside backticks, but Github Markdown messes up the formatting)sudo reboot now# Requires restartgit clone git@github.com:iamaaditya/dotfiles.git~/dotfiles/install.sh# Run the commands to make the shortcutsgit clone https://github.com/VundleVim/Vundle.vim.git ~/.vim/bundle/Vundle.vim# Install bundleSolarized Color for vim
cd ~/.vim/colors/wget https://raw.githubusercontent.com/altercation/vim-colors-solarized/master/colors/solarized.vimPowerline & associated fonts
pip install powerline-status# Powerlinewget https://github.com/Lokaltog/powerline/raw/develop/font/PowerlineSymbols.otf https://github.com/Lokaltog/powerline/raw/develop/font/10-powerline-symbols.confmkdir -p ~/.fonts/ && mv PowerlineSymbols.otf ~/.fonts/fc-cache -vf ~/.fontsmkdir -p ~/.config/fontconfig/conf.d/ && mv 10-powerline-symbols.conf ~/.config/fontconfig/conf.d/Note - if some aspects of powerline does not show up, check http://askubuntu.com/questions/283908/how-can-i-install-and-use-powerline-plugin
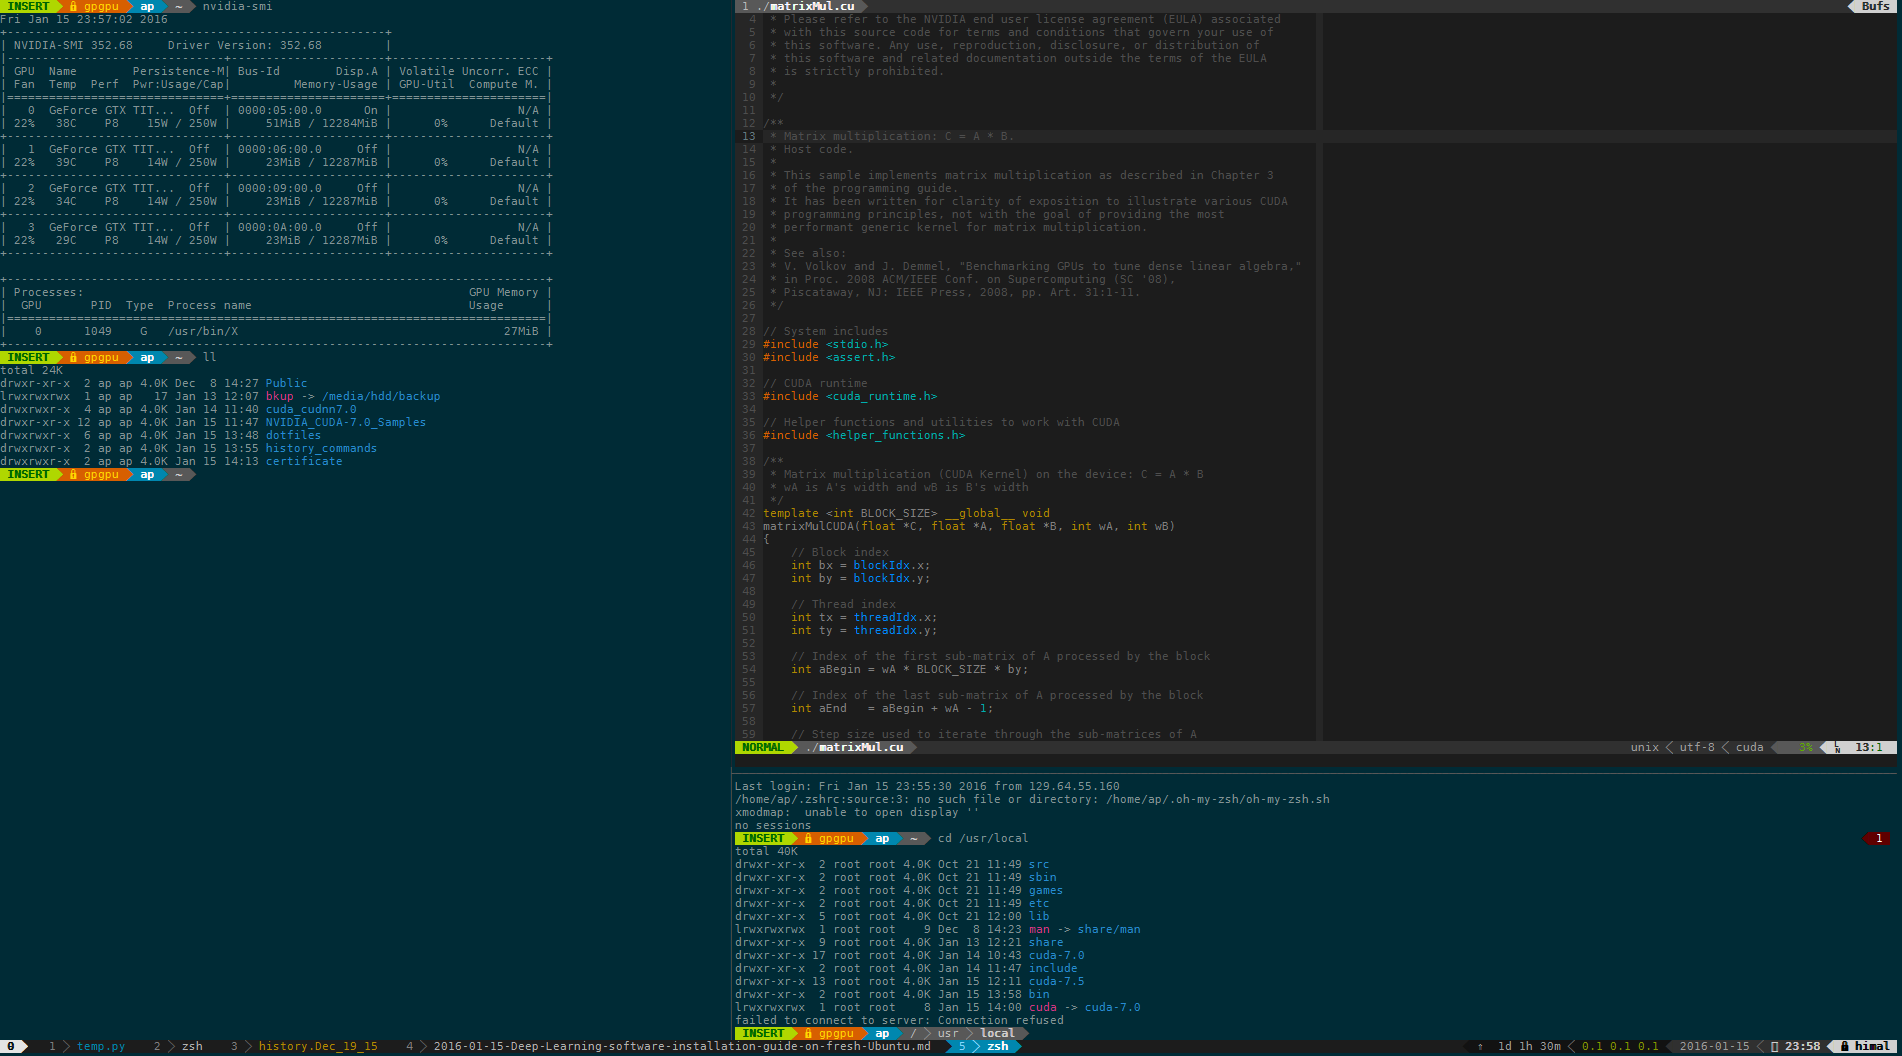
If you are curious on what this customization looks like, take a look at this screenshot. Here it shows Tmux session with multiple windows, and a multiple panes in the same window. Switching windows and panes in Tmux is very easy. Copy information across windows, sessions and servers is really at the tip of the finger. Also Solarized colors make it tolerable to use the screen for hours.